Layering a Screen
This guide assumes that you have already read Drawing a Screen.
JLayeredPane Creation
As defined in the documentation, a "JLayeredPane adds depth to a JFC/Swing container, allowing components to overlap each other when needed. An Integer object specifies each component's depth in the container, where higher-numbered components sit 'on top' of other components.".
A JLayeredPane can be created as follows.
public class ExampleA {
	public static void main(final String[] args) {
		try {
			UIManager.setLookAndFeel(VTerminalLookAndFeel.getInstance(24));
		} catch (final UnsupportedLookAndFeelException e) {
			e.printStackTrace();
		}

		SwingUtilities.invokeLater(() -> {
			final var layeredPane = new JLayeredPane();
			layeredPane.setLayout(new OverlayLayout(layeredPane));
		});
	}
}
When adding a component to the JLayerePane, you must specify the layer as an Integer object and not an int primitive.
public class ExampleB {
	public static void main(final String[] args) {
		try {
			UIManager.setLookAndFeel(VTerminalLookAndFeel.getInstance(24));
		} catch (final UnsupportedLookAndFeelException e) {
			e.printStackTrace();
		}

		SwingUtilities.invokeLater(() -> {
			final var layeredPane = new JLayeredPane();
			layeredPane.setLayout(new OverlayLayout(layeredPane));

			final var bottomPanel = new VPanel(40, 20);
			layeredPane.add(bottomPanel, Integer.valueOf(0));

			final var topPanel = new VPanel(40, 20);
			layeredPane.add(topPanel, Integer.valueOf(1));
		});
	}
}
Opaque Components
All Swing components have access to the setOpaque() method. Most components have this set to false by default. As the documentation states, "If true the component paints every pixel within its bounds. Otherwise, the component may not paint some or all of its pixels, allowing the underlying pixels to show through.".
public class ExampleC {
	public static void main(final String[] args) {
		try {
			UIManager.setLookAndFeel(VTerminalLookAndFeel.getInstance(24));
		} catch (final UnsupportedLookAndFeelException e) {
			e.printStackTrace();
		}

		SwingUtilities.invokeLater(() -> {
			final var layeredPane = new JLayeredPane();
			layeredPane.setLayout(new OverlayLayout(layeredPane));

			final var bottomPanel = new VPanel(40, 20);
			bottomPanel.setOpaque(true);
			layeredPane.add(bottomPanel, Integer.valueOf(0));

			final var topPanel = new VPanel(40, 20);
			bottomPanel.setOpaque(false);
			layeredPane.add(topPanel, Integer.valueOf(1));
		});
	}
}
Layering Screens
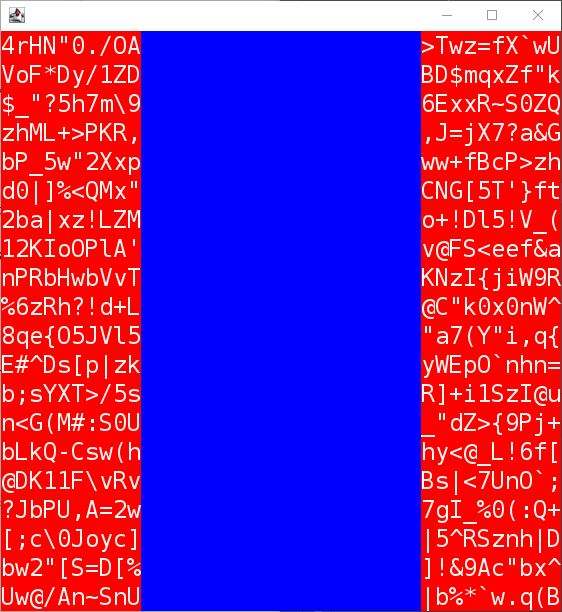
Using the information above, you should now be able to understand the following examples. The only difference between the two is that the second example sets topPanel as opaque.
public class ExampleD {
	public static void main(final String[] args) {
		try {
			UIManager.setLookAndFeel(VTerminalLookAndFeel.getInstance(24));
		} catch (final UnsupportedLookAndFeelException e) {
			e.printStackTrace();
		}

		SwingUtilities.invokeLater(() -> {
			final var layeredPane = new JLayeredPane();
			layeredPane.setLayout(new OverlayLayout(layeredPane));

			final var bottomPanel = new VPanel(40, 20);
			bottomPanel.setOpaque(true);
			layeredPane.add(bottomPanel, Integer.valueOf(0));

			final var topPanel = new VPanel(20, 20);
			topPanel.setOpaque(false);
			layeredPane.add(topPanel, Integer.valueOf(1));

			final var frame = new JFrame();
			frame.add(layeredPane);
			frame.setDefaultCloseOperation(WindowConstants.EXIT_ON_CLOSE);
			frame.setVisible(true);
			frame.pack();
			frame.setLocationRelativeTo(null);

			for (int y = 0 ; y < bottomPanel.getHeightInTiles() ; y++) {
				for (int x = 0 ; x < bottomPanel.getWidthInTiles() ; x++) {
					bottomPanel.setCodePointAt(x, y, getRandomCodePoint());
				}
			}

			bottomPanel.setBackground(Color.RED);
			topPanel.setBackground(new Color(0, 0, 255, 100));
		});
	}

	private static int getRandomCodePoint() {
		return ThreadLocalRandom.current().nextInt(33, 127);
	}
}
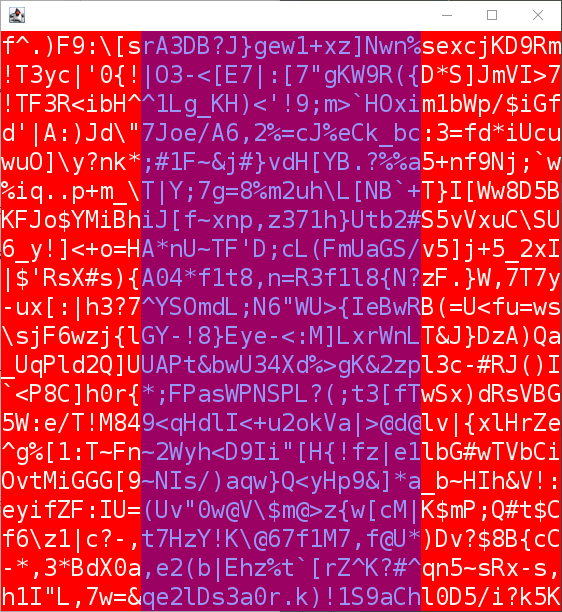
public class ExampleE {
	public static void main(final String[] args) {
		try {
			UIManager.setLookAndFeel(VTerminalLookAndFeel.getInstance(24));
		} catch (final UnsupportedLookAndFeelException e) {
			e.printStackTrace();
		}

		SwingUtilities.invokeLater(() -> {
			final var layeredPane = new JLayeredPane();
			layeredPane.setLayout(new OverlayLayout(layeredPane));

			final var bottomPanel = new VPanel(40, 20);
			bottomPanel.setOpaque(true);
			layeredPane.add(bottomPanel, Integer.valueOf(0));

			final var topPanel = new VPanel(20, 20);
			topPanel.setOpaque(true);
			layeredPane.add(topPanel, Integer.valueOf(1));

			final var frame = new JFrame();
			frame.add(layeredPane);
			frame.setDefaultCloseOperation(WindowConstants.EXIT_ON_CLOSE);
			frame.setVisible(true);
			frame.pack();
			frame.setLocationRelativeTo(null);

			for (int y = 0 ; y < bottomPanel.getHeightInTiles() ; y++) {
				for (int x = 0 ; x < bottomPanel.getWidthInTiles() ; x++) {
					bottomPanel.setCodePointAt(x, y, getRandomCodePoint());
				}
			}

			bottomPanel.setBackground(Color.RED);
			topPanel.setBackground(new Color(0, 0, 255, 100));
		});
	}

	private static int getRandomCodePoint() {
		return ThreadLocalRandom.current().nextInt(33, 127);
	}
}